이전 포스팅
2022.11.28 - [기타/tkinter 한꼬집씩만 따라해보기] - 30. 위젯에 툴팁 붙이기
30. 위젯에 툴팁 붙이기
이전 포스팅 2022.11.28 - [기타/tkinter 한꼬집씩만 따라해보기] - 29. 스핀박스 위젯 추가하기 29. 스핀박스 위젯 추가하기 이전 포스팅 2022.11.28 - [기타/tkinter 한꼬집씩만 따라해보기] - 28. 메인윈도우
martinii.fun
이번 포스팅에서는 : 커스텀 테마 적용하기
tkinter로 만든 GUI에 특별한 디자인 테마를 적용할 수 있습니다.
적용방법은 여러 가지가 있지만, 이번 포스팅에서는
① 가장 간편하게 GUI의 룩앤필을 수정할 수 있는 ttkthemes 모듈,
② 미리 작성된(수정가능한) tcl 테마파일을 다운로드하고 적용하는 방법,
③ 마지막으로 ttkbootstrap에 대해서 소개해드리려고 합니다.
1. ttkthemes 적용하기
ttkthemes의 사용방법은 너무너무 간단해서, 임포트 한 줄, 코드 한 줄이면 됩니다.
우선 pip로 ttkthemes를 설치해줍니다.

아래는 기존 ttk GUI입니다. 이 GUI창을 기준으로 비교해보려고 합니다.
코드는 별 의미 없지만 바로 아래에 첨부해놓겠습니다.

코드는 이것저것 다 때려넣느라 다소 깁니다. 아무 영양가 없는 코드지만,
(우측의 트리뷰를 제외하고) 지금까지 배웠던 거의 모든 위젯에 대해 쭉 다루고 있으니
복습 겸 훑어보셔도 괜찮겠습니다.
import tkinter as tk
from tkinter import ttk

# from ttkthemes import ThemedTk

# win = ThemedTk(theme="blue")  # "arc","blue","clearlooks","elegance","kroc","plastik","radiance","ubuntu","winxpblue"
win = tk.Tk()
win.title("blue 테마")
win.iconbitmap("./ddsomb.ico")
win.geometry("640x420")
win.resizable(width=False, height=False)

상태표시줄여부 = tk.IntVar()
상태표시줄여부.set(1)


def 더미_콜백():
    pass


메뉴바 = tk.Menu(win)  # font="gulim 18"
win.config(menu=메뉴바)
win.option_add("*Font", '"D2Coding Ligature" 10')

파일 = tk.Menu(메뉴바, tearoff=False)
편집 = tk.Menu(메뉴바, tearoff=False)
서식 = tk.Menu(메뉴바, tearoff=False)
보기 = tk.Menu(메뉴바, tearoff=False)
확대축소 = tk.Menu(보기, tearoff=False)
도움말 = tk.Menu(메뉴바, tearoff=False)

메뉴바.add_cascade(label="파일(F)", menu=파일)
메뉴바.add_cascade(label="편집(E)", menu=편집)
메뉴바.add_cascade(label="서식(O)", menu=서식)
메뉴바.add_cascade(label="보기(V)", menu=보기)
메뉴바.add_cascade(label="도움말(H)", menu=도움말)

파일.add_command(label="새로 만들기(N)", command=더미_콜백)
파일.add_command(label="새 창(W)", command=더미_콜백)
파일.add_command(label="열기(O)", command=더미_콜백)
파일.add_command(label="저장(S)", command=더미_콜백)
파일.add_command(label="다른 이름으로 저장(A)", command=더미_콜백)
파일.add_separator()  # 구분자
파일.add_command(label="페이지 설정(U)", command=더미_콜백)
파일.add_command(label="인쇄(P)", command=더미_콜백)
파일.add_separator()  # 구분자
파일.add_command(label="끝내기(X)", command=더미_콜백)

편집.add_command(label="실행 취소(U)", command=더미_콜백)
편집.add_separator()  # 구분자
편집.add_command(label="잘라내기(T)", command=더미_콜백)
편집.add_command(label="복사(C)", command=더미_콜백)
편집.add_command(label="붙여넣기(P)", command=더미_콜백)
편집.add_command(label="삭제(L)", command=더미_콜백)
편집.add_separator()  # 구분자
편집.add_command(label="Bing으로 검색(S)", command=더미_콜백)
편집.add_command(label="찾기(F)", command=더미_콜백)
편집.add_command(label="다음 찾기(N)", command=더미_콜백)
편집.add_command(label="이전 찾기(V)", command=더미_콜백)
편집.add_command(label="바꾸기(R)", command=더미_콜백)
편집.add_command(label="이동(G)", command=더미_콜백)
편집.add_separator()  # 구분자
편집.add_command(label="모두 선택(A)", command=더미_콜백)
편집.add_command(label="시간/날짜(D)", command=더미_콜백)

서식.add_command(label="자동 줄 바꿈(W)", command=더미_콜백)
서식.add_command(label="글꼴(F)", command=더미_콜백)

보기.add_cascade(label="확대하기/축소하기", menu=확대축소)  # 하위메뉴 있음
보기.add_checkbutton(label="상태 표시줄(S)", variable=상태표시줄여부)

확대축소.add_command(label="확대(I)", command=더미_콜백)
확대축소.add_command(label="축소(O)", command=더미_콜백)
확대축소.add_command(label="확대하기/축소하기 기본값 복원", command=더미_콜백)

도움말.add_command(label="도움말 보기(H)", command=더미_콜백)
도움말.add_command(label="피드백 보내기(F)", command=더미_콜백)
도움말.add_separator()  # 구분자
도움말.add_command(label="메모장 정보(A)", command=더미_콜백)

tab = ttk.Notebook(win, width=640, height=410)
tab.grid(columnspan=2, )
frame1 = ttk.Frame(tab)
frame2 = ttk.Frame(tab)
frame3 = ttk.Frame(tab)
tab.add(frame1, text="   탭 1   ")
tab.add(frame2, text="   탭 2   ")
tab.add(frame3, text="   탭 3   ")
ttk.Label(frame1, text="ttk 레이블").grid(columnspan=2, row=0, pady=10)
ttk.Checkbutton(frame1, text="ttk 체크버튼").grid(columnspan=2, row=1, pady=10)
ttk.Radiobutton(frame1, text="ttk 라디오버튼").grid(columnspan=2, row=2, pady=10)
ttk.Label(frame1, text="ttk 콤보박스").grid(columnspan=2, row=3, pady="20 0")
ttk.Combobox(frame1, values=("a", "b", "c", "d", "e")).grid(columnspan=2, row=4, pady=10, padx="20 0")
ttk.Label(frame1, text="ttk 스핀박스").grid(columnspan=2, row=5, pady="20 0")
ttk.Spinbox(frame1, values=("1", "2", "3", "4", "5")).grid(columnspan=2, row=6, pady=10, padx="20 0")
ttk.Label(frame1, text="ttk 엔트리").grid(columnspan=2, row=0, column=2)
ttk.Entry(frame1).grid(columnspan=2, row=1, column=2, pady=10, padx=10)
frame = ttk.Labelframe(frame1, text="레이블 프레임", labelanchor="n")
frame.grid(row=2, column=2, pady=10, sticky="we")
frame.grid_columnconfigure(0, weight=1)
ttk.Label(frame, text="레이블1", anchor="center").grid(columnspan=2, row=0, column=0, pady=10)
ttk.Label(frame, text="레이블2", anchor="center").grid(columnspan=2, row=1, column=0, pady=10)

ttk.Label(frame1, text="ttk 프로그레스바").grid(columnspan=2, row=3, column=2, pady="20 0")
ttk.Progressbar(frame1, mode="indeterminate").grid(columnspan=2, row=4, column=2, pady=10)

ttk.Label(frame1, text="ttk 버튼").grid(columnspan=2, row=5, column=2, pady="20 0")
ttk.Button(frame1, text="Quit", command=win.destroy).grid(columnspan=2, row=6, column=2, pady=10)

ttk.Label(frame1, text="ttk 트리뷰").grid(row=0, column=4)
tv = ttk.Treeview(frame1, height=14)
tv.grid(row=1, column=4, rowspan=6)
tv['columns'] = ('Rank', 'Name', 'Badge')
tv.column('#0', width=0, stretch=tk.NO)
tv.column('Rank', anchor=tk.CENTER, width=80)
tv.column('Name', anchor=tk.CENTER, width=80)
tv.column('Badge', anchor=tk.CENTER, width=80)

tv.heading('#0', text='', anchor=tk.CENTER)
tv.heading('Rank', text='순번', anchor=tk.CENTER)
tv.heading('Name', text='위젯명', anchor=tk.CENTER)
tv.heading('Badge', text='난이도', anchor=tk.CENTER)

tv.insert(parent='', index=0, iid="0", text='', values=('0', '레이블', '하'))
tv.insert(parent='', index=1, iid="1", text='', values=('1', '버튼', '하'))
tv.insert(parent='', index=2, iid="2", text='', values=('2', '엔트리', '하'))
tv.insert(parent='', index=3, iid="3", text='', values=('3', '콤보박스', '하'))
tv.insert(parent='', index=4, iid="4", text='', values=('4', '체크버튼', '하'))
tv.insert(parent='', index=5, iid="5", text='', values=('5', '라디오버튼', '중'))
tv.insert(parent='', index=6, iid="6", text='', values=('6', '텍스트창', '중'))
tv.insert(parent='', index=7, iid="7", text='', values=('7', '프레임', '하'))
tv.insert(parent='', index=8, iid="8", text='', values=('8', '프로그레스바', '상'))
tv.insert(parent='', index=9, iid="9", text='', values=('9', '메뉴바', '상'))
tv.insert(parent='', index=10, iid="10", text='', values=('10', '탭', '중'))
tv.insert(parent='', index=11, iid="11", text='', values=('11', '메시지박스', '하'))
tv.insert(parent='', index=12, iid="12", text='', values=('12', '스핀박스', '하'))
tv.insert(parent='', index=13, iid="13", text='', values=('13', '툴팁', '하'))
tv.insert(parent='', index=14, iid="14", text='', values=('14', '캔버스', '상'))

win.mainloop()
이제 이 GUI창에 커스텀 테마를 적용해보겠습니다.
추가/수정해야 하는 라인은 딱 두 줄, 임포트문과 win=tk.Tk() 라인입니다.
기존코드 최상단을
import tkinter as tk
from tkinter import ttk

win = tk.Tk()

# ~
아래처럼 바꿔주시면 됩니다.
import tkinter as tk
from tkinter import ttk

from ttkthemes import ThemedTk

win = ThemedTk(theme="blue")

# ~
코드에서 보셨다시피
메인윈도우인 win을 생성할 때 win = tk.Tk()로 생성하는 대신
win = ThemedTk(theme=테마이름) 으로 생성하기만 하면 됩니다.
ttkthemes에서 제공하는 기본 테마는 아래 25개입니다.
공식 문서에서는 모든 테마의 예제 GUI를 보여주고 있습니다.
Themes — ttkthemes v3.2.2 documentation
ttkthemes includes a wide variety of different themes, and there is always room for more themes, no matter how ugly or obscure! Even though some themes may not be used in practice, the original goal of the project has not been forgotten: To gather and pres
ttkthemes.readthedocs.io
"adapta", "aquativo", "arc", "black", "blue", "breeze", "clearlooks", "elegance", "equilux",
"itft1", "keramik", "kroc", "plastik", "radiance", "scidblue", "scidgreen", "scidgrey",
"scidmint", "scidpink", "scidpurple", "scidsand", "smog", "ubuntu", "winxpblue", "yaru",
이번 포스팅에서는 이 중 아홉 가지 테마인
"arc", "blue", "clearlooks", "elegance", "kroc", "plastik", "ubuntu", "winxpblue", "breeze"을 보여드리겠습니다.
나머지 테마들이 덜 멋지다는 뜻은 아닙니다. 랜덤하게 아홉 개만 골랐습니다.
1. arc
win = ThemedTk(theme="arc")
2. blue
win = ThemedTk(theme="blue")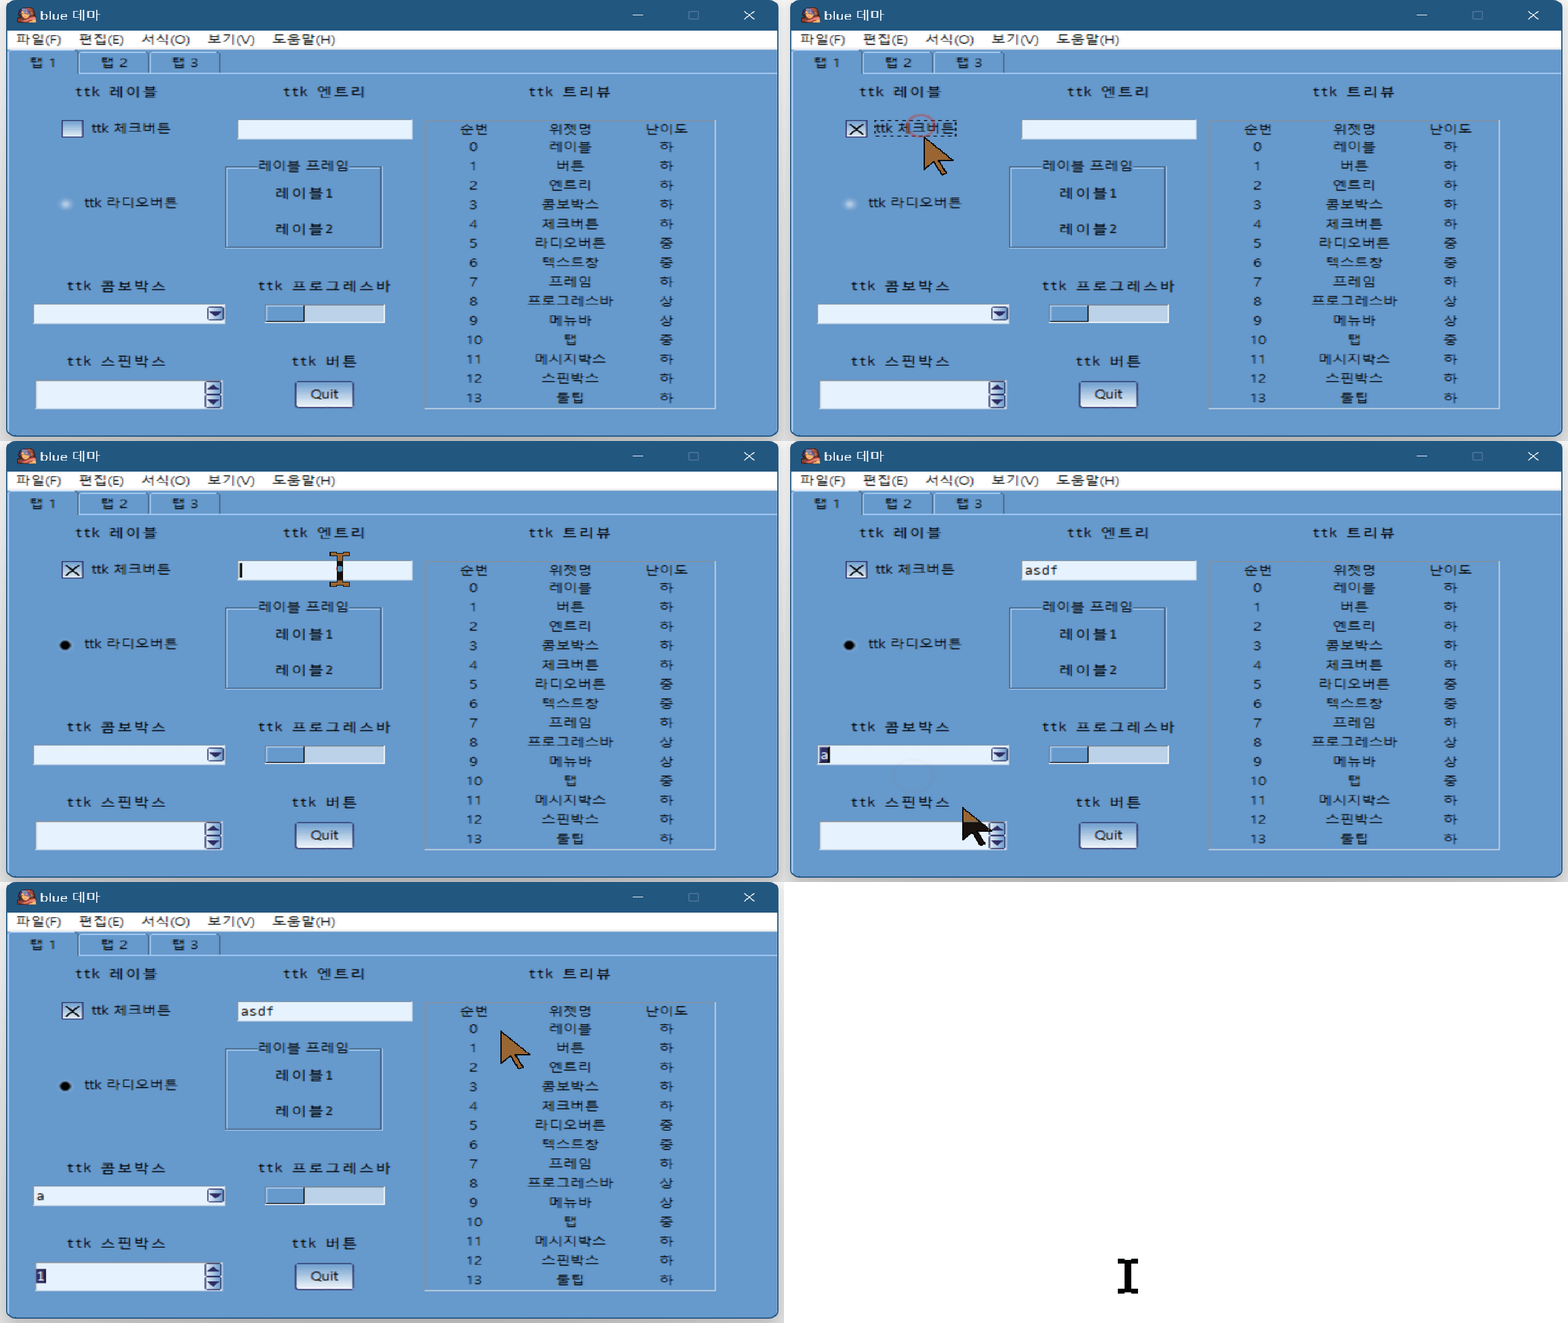
3. clearlooks
win = ThemedTk(theme="clearlooks")
4. elegance
win = ThemedTk(theme="elegance")
5. kroc
win = ThemedTk(theme="kroc")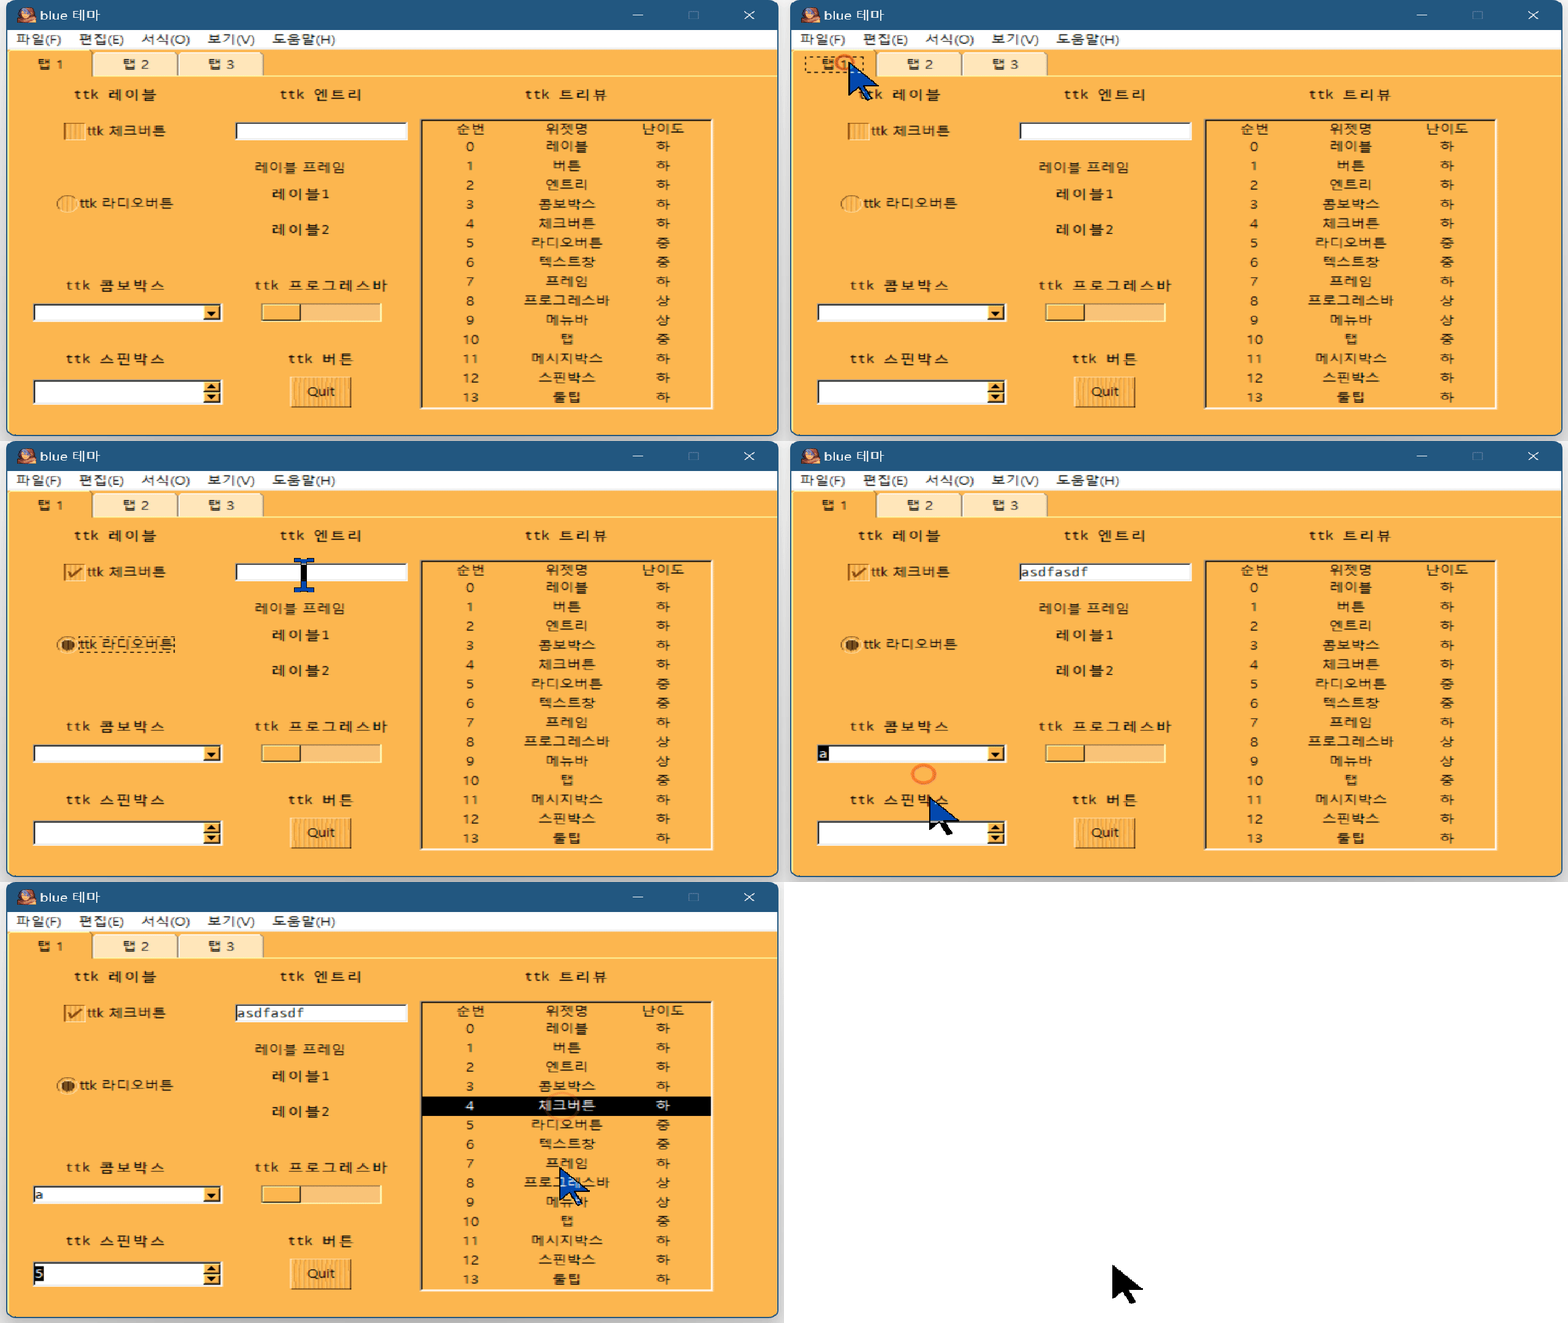
6. plastik
win = ThemedTk(theme="plastik")
7. ubuntu
win = ThemedTk(theme="ubuntu")
8. winxpblue
win = ThemedTk(theme="winxpblue")
9. breeze
win = ThemedTk(theme="breeze")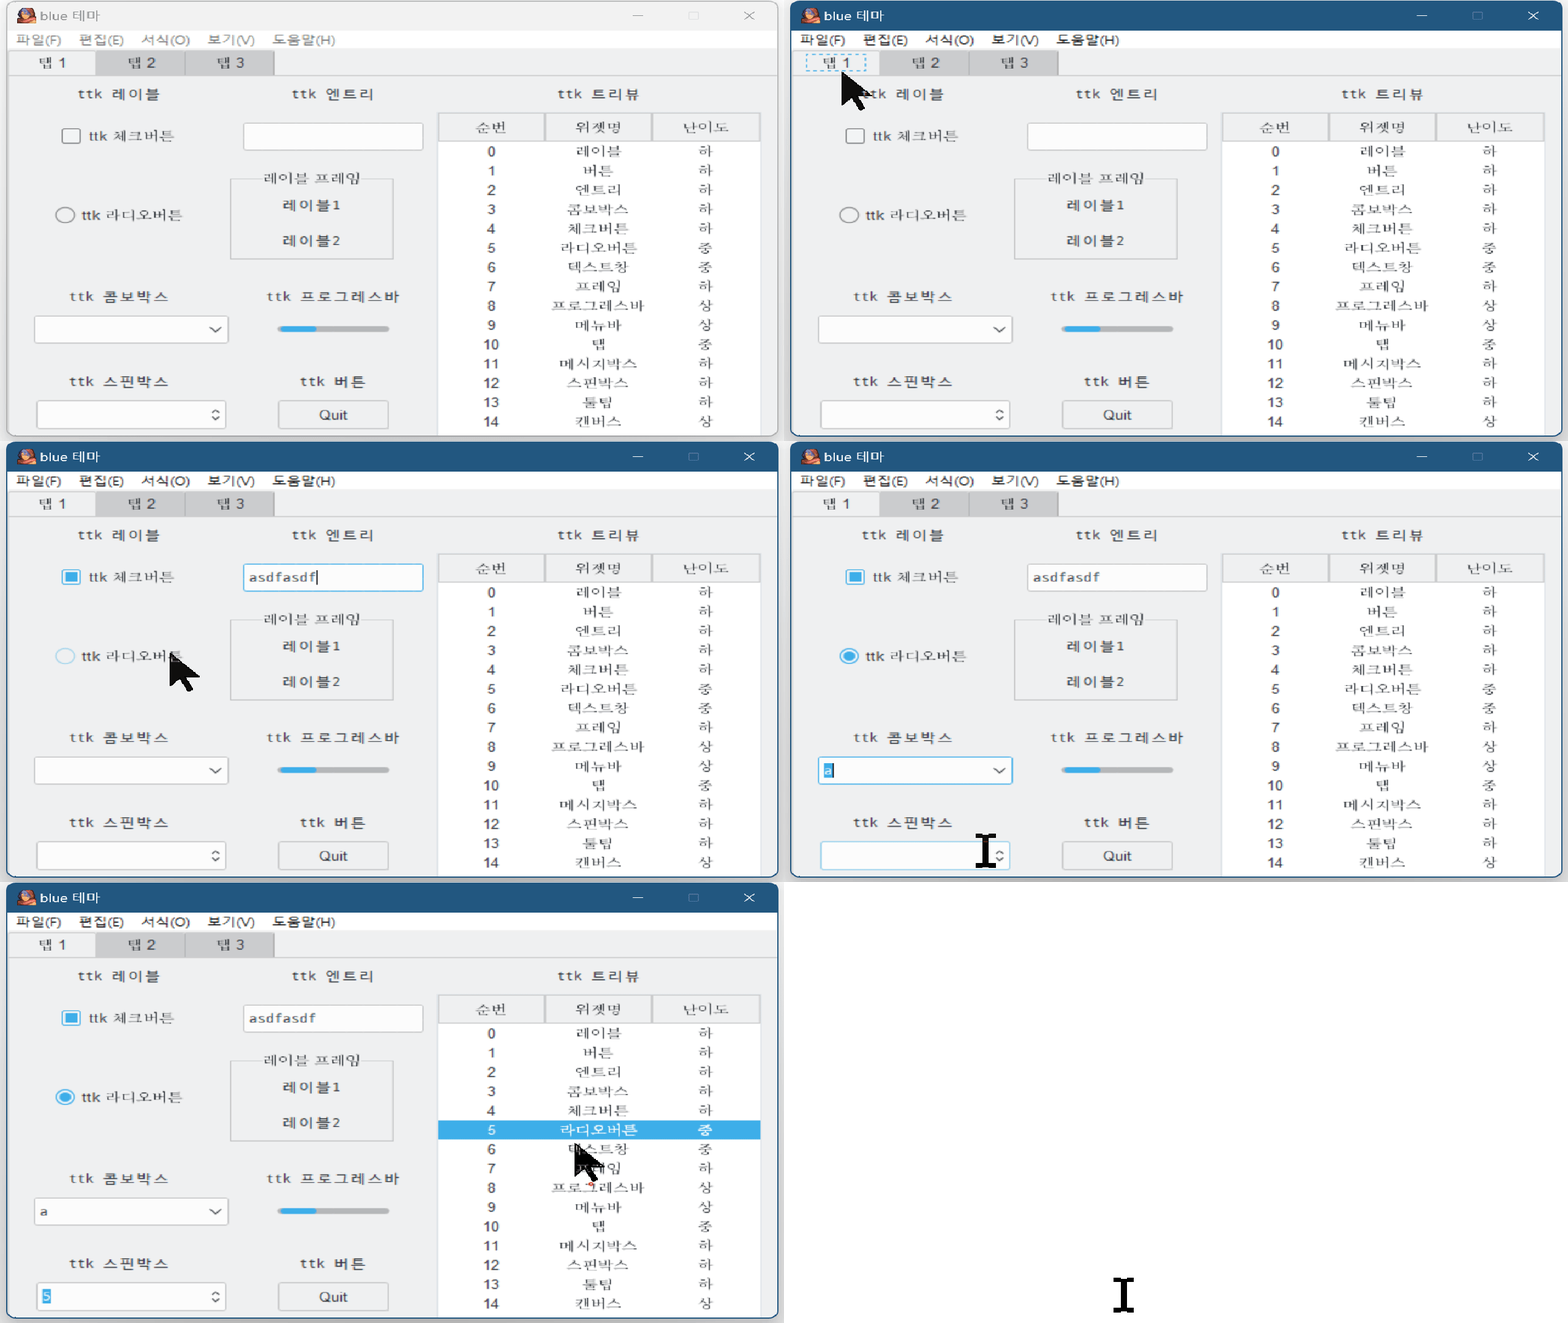
여기까지
엄청나게 간편하게 룩앤필을 적용하거나 수정할 수 있는 ttkthemes에 대해 알아보았습니다.
2. tcl 테마파일 이용하기
아래 웹페이지를 참고하시면 tkinter와 호환되는 서드파티 테마인 tcl 파일을 다운받으실 수 있습니다.
List of ttk themes | Tkinter docs (rdbende.github.io)
List of ttk themes | Tkinter docs
List of ttk themes Most of the ttk themes are old, and ugly, but there are nice and modern ones. This is a complete list of ttk themes with additional useful information about them.
rdbende.github.io
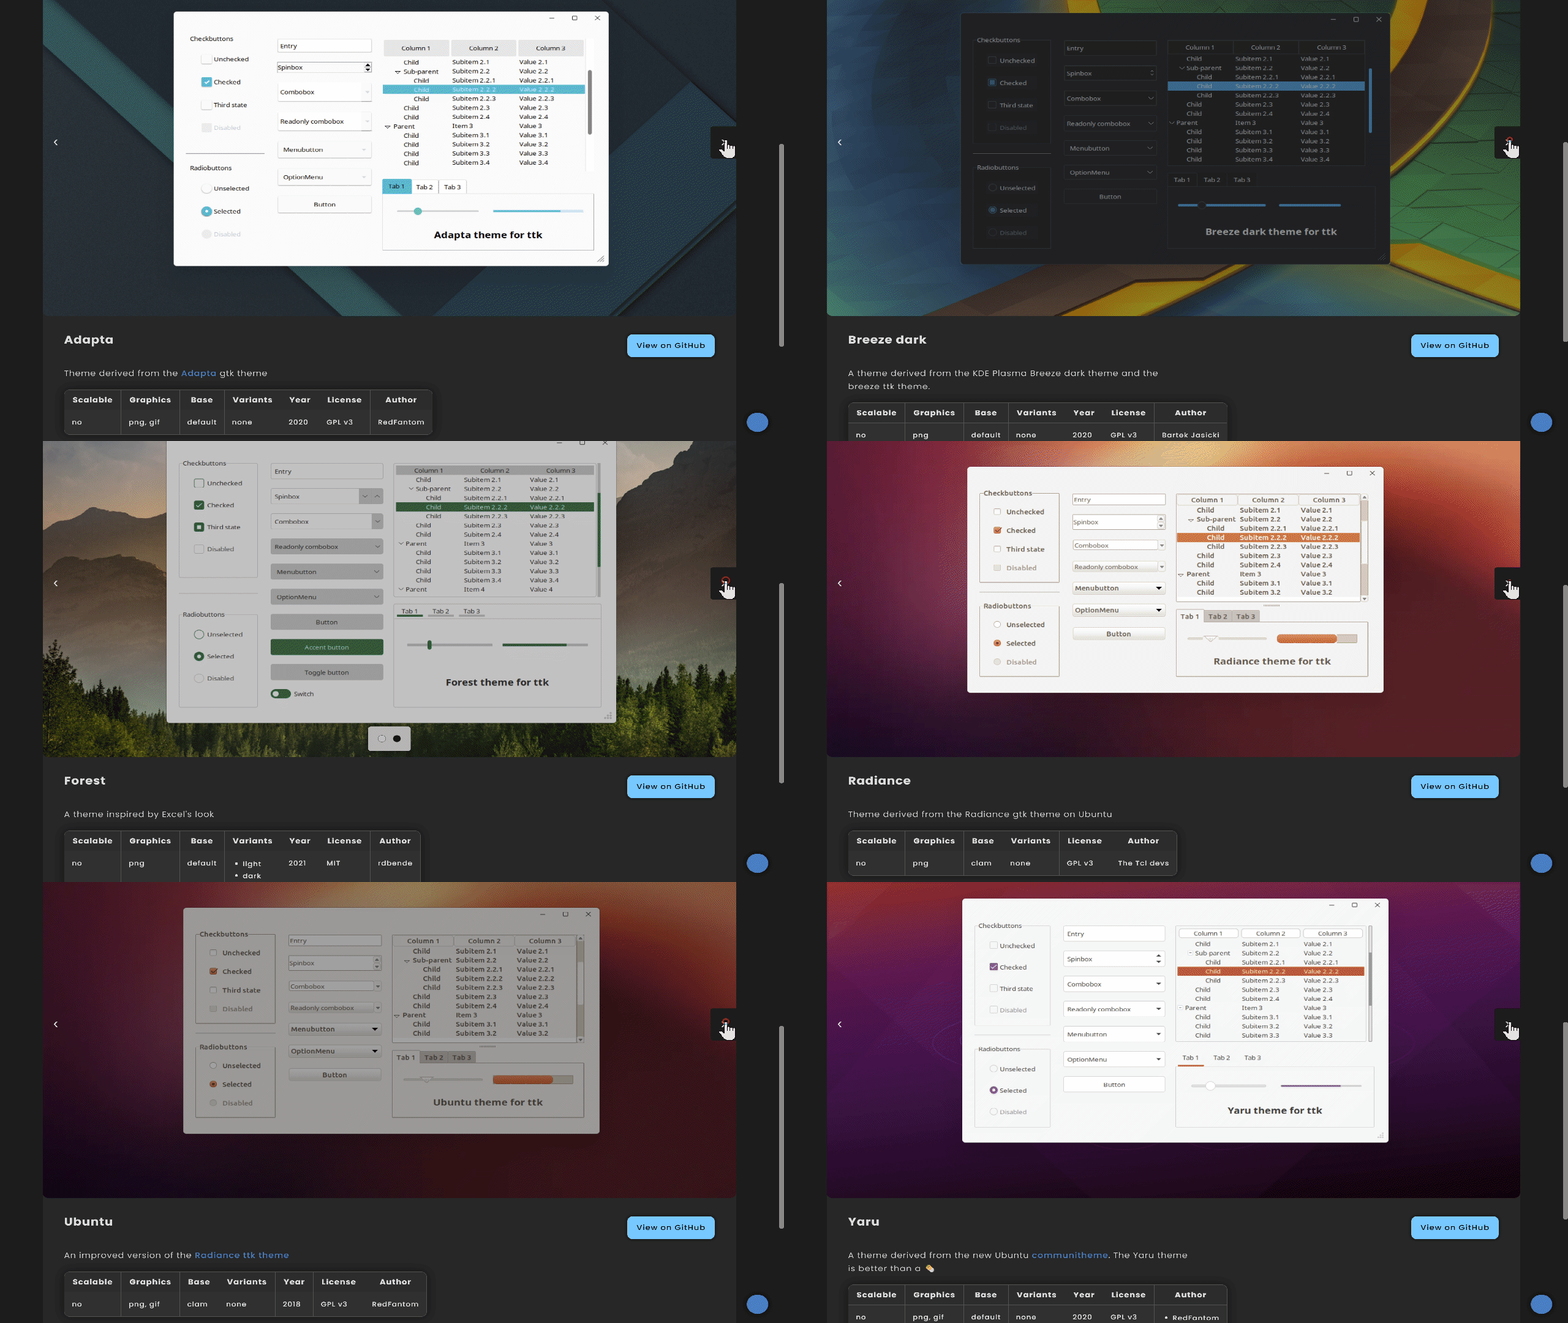
저는 깃헙의 azure 레포에서 dark.tcl 파일을 적용해보겠습니다.
GitHub - rdbende/Azure-ttk-theme: A stunning modern theme for ttk inspired by Fluent Design 💠
GitHub - rdbende/Azure-ttk-theme: A stunning modern theme for ttk inspired by Fluent Design 💠
A stunning modern theme for ttk inspired by Fluent Design 💠 - GitHub - rdbende/Azure-ttk-theme: A stunning modern theme for ttk inspired by Fluent Design 💠
github.com
적용방법은 아래와 같습니다. 위젯삽입은 위와 동일한 코드를 사용하였습니다.
import tkinter as tk
from tkinter import ttk


def darkstyle(root):
    style = ttk.Style(root)
    root.tk.call('source', 'azure dark/azure dark.tcl')
    style.theme_use('azure')
    style.configure("Accentbutton", foreground='white')
    style.configure("Togglebutton", foreground='white')
    return style


win = tk.Tk()
style = darkstyle(win)
# ~
azure 예제파일에서는 아래와 같은 코딩스타일로 테마를 적용하고 있습니다.
# ~

style = ttk.Style(root)
root.tk.call('source', r'C:\Users\smj02\PycharmProjects\tkinter_tutorial\azure dark\azure dark.tcl')
style.theme_use('azure')

# ~
아래는 azure dark 테마의 example.py 파일의 코드 전체입니다.
import tkinter as tk
from tkinter import ttk

root = tk.Tk()
root.title('Azure')

window_height = 530
window_width = 800

screen_width = root.winfo_screenwidth()
screen_height = root.winfo_screenheight()

x_cordinate = int((screen_width/2) - (window_width/2))
y_cordinate = int((screen_height/2) - (window_height/2))

root.geometry("{}x{}+{}+{}".format(window_width, window_height, x_cordinate, y_cordinate))

style = ttk.Style(root)
root.tk.call('source', r'C:\Users\smj02\PycharmProjects\tkinter_tutorial\azure dark\azure dark.tcl')
style.theme_use('azure')

options = ['', 'OptionMenu', 'Value 1', 'Value 2']
a = tk.IntVar()
b = tk.IntVar()
b.set(1)
c = tk.IntVar()
d = tk.IntVar()
d.set(2)
e = tk.StringVar()
e.set(options[1])
f = tk.IntVar()
g = tk.IntVar()
g.set(75)
h = tk.IntVar()

frame1 = ttk.LabelFrame(root, text='Checkbuttons', width=210, height=200)
frame1.place(x=20, y=12)

frame2 = ttk.LabelFrame(root, text='Radiobuttons', width=210, height=160)
frame2.place(x=20, y=252)

check1 = ttk.Checkbutton(frame1, text='Unchecked', variable=a, offvalue=0, onvalue=1)
check1.place(x=20, y=20)
check2 = ttk.Checkbutton(frame1, text='Checked', variable=b, offvalue=0, onvalue=1)
check2.place(x=20, y=60)
check3 = ttk.Checkbutton(frame1, text='Third state', variable=c, offvalue=0, onvalue=1)
check3.state(['alternate'])
check3.place(x=20, y=100)
check4 = ttk.Checkbutton(frame1, text='Disabled', state='disabled')
check4.place(x=20, y=140)

radio1 = ttk.Radiobutton(frame2, text='Deselected', variable=d, value=1)
radio1.place(x=20, y=20)
radio2 = ttk.Radiobutton(frame2, text='Selected', variable=d, value=2)
radio2.place(x=20, y=60)
radio3 = ttk.Radiobutton(frame2, text='Disabled', state='disabled')
radio3.place(x=20, y=100)

entry = ttk.Entry(root)
entry.place(x=250, y=20)
entry.insert(0, 'Entry')

spin = ttk.Spinbox(root, from_=0, to=100, increment=0.1)
spin.place(x=250, y=70)
spin.insert(0, 'Spinbox')

combo1 = ttk.Combobox(root, value=['Combobox', 'Editable item 1', 'Editable item 2'])
combo1.current(0)
combo1.place(x=250, y=120)

combo2 = ttk.Combobox(root, state='readonly', value=['Readonly combobox', 'Item 1', 'Item 2'])
combo2.current(0)
combo2.place(x=250, y=170)

menu = tk.Menu(root, tearoff=0)
menu.add_command(label='Menu item 1')
menu.add_command(label='Menu item 2')
menu.add_separator()
menu.add_command(label='Menu item 3')
menu.add_command(label='Menu item 4')

menubtn = ttk.Menubutton(root, text='Menubutton', menu=menu, direction='below')
menubtn.place(x=250, y=220)

menubtn = ttk.OptionMenu(root, e, *options)
menubtn.place(x=250, y=270)

def callback():
    print('Button callback')

button = ttk.Button(root, text='Button', command=callback)
button.place(x=250, y=320)

accentbutton = ttk.Button(root, text='Accent button', style='Accentbutton', command=callback)
accentbutton.place(x=250, y=370)

toggle = ttk.Checkbutton(root, text='Toggle button', style='Togglebutton', variable=f, offvalue=0, onvalue=1)
toggle.place(x=250, y=420)

def scale(i):
    g.set(int(scale.get()))

scale = ttk.Scale(root, from_=100, to=0, variable=g, command=scale)
scale.place(x=80, y=430)

progress = ttk.Progressbar(root, value=0, variable=g, mode='determinate')
progress.place(x=80, y=480)

switch = ttk.Checkbutton(root, text='Toggle switch', style='Switch', variable=h, offvalue=0, onvalue=1)
switch.place(x=250, y=470)
switch.invoke()

size = ttk.Sizegrip(root)
size.place(x=780, y=510)

sep1 = ttk.Separator()
sep1.place(x=20, y=235, width=210)

notebook = ttk.Notebook(root)
notebookTab1 = ttk.Frame(notebook, width=335, height=150)
notebook.add(notebookTab1, text='Tab 1')
notebookTab2 = ttk.Frame(notebook, width=335, height=150)
notebook.add(notebookTab2, text='Tab 2')
notebookTab3 = ttk.Frame(notebook, width=335, height=150)
notebook.add(notebookTab3, text='Tab 3')
notebook.place(x=420, y=330)

treeFrame = ttk.Frame(root)
treeFrame.place(x=420, y=20)

treeScroll = ttk.Scrollbar(treeFrame)
treeScroll.pack(side='right', fill='y')

treeview = ttk.Treeview(treeFrame, selectmode="extended", yscrollcommand=treeScroll.set, columns=(1, 2), height=12)
treeview.pack()

treeScroll.config(command=treeview.yview)

treeview.column("#0", width=120)
treeview.column(1, anchor='w', width=100)
treeview.column(2, anchor='w', width=100)

treeview.heading("#0", text="Treeview", anchor='center')
treeview.heading(1, text="Column 1", anchor='center')
treeview.heading(2, text="Column 2", anchor='center')

treeview.insert(parent='', index='end', iid=1, text="Parent", values=("Item 1", "Value 1"))
treeview.item(1, open=True)
treeview.insert(parent=1, index='end', iid=2, text="Child", values=("Subitem 1.1", "Value 1.1"))
treeview.insert(parent=1, index='end', iid=3, text="Child", values=("Subitem 1.2", "Value 1.2"))
treeview.insert(parent=1, index='end', iid=4, text="Child", values=("Subitem 1.3", "Value 1.3"))
treeview.insert(parent=1, index='end', iid=5, text="Child", values=("Subitem 1.4", "Value 1.4"))
treeview.insert(parent='', index='end', iid=6, text="Parent", values=("Item 2", "Value 2"))
treeview.item(6, open=True)
treeview.insert(parent=6, index='end', iid=13, text="Child", values=("Subitem 2.1", "Value 2.1"))
treeview.insert(parent=6, index='end', iid=7, text="Sub-parent", values=("Subitem 2.2", "Value 2.2"))
treeview.item(7, open=True)
treeview.insert(parent=7, index='end', iid=8, text="Child", values=("Subitem 2.2.1", "Value 2.2.1"))
treeview.insert(parent=7, index='end', iid=9, text="Child", values=("Subitem 2.2.2", "Value 2.2.2"))
treeview.selection_set(9)
treeview.insert(parent=7, index='end', iid=10, text="Child", values=("Subitem 2.2.3", "Value 2.2.3"))
treeview.insert(parent=6, index='end', iid=11, text="Child", values=("Subitem 2.3", "Value 2.3"))
treeview.insert(parent=6, index='end', iid=12, text="Child", values=("Subitem 2.4", "Value 2.4"))
treeview.insert(parent='', index='end', iid=14, text="Parent", values=("Item 3", "Value 3"))
treeview.item(14, open=True)
treeview.insert(parent=14, index='end', iid=15, text="Child", values=("Subitem 3.1", "Value 3.1"))
treeview.insert(parent=14, index='end', iid=16, text="Child", values=("Subitem 3.2", "Value 3.2"))
treeview.insert(parent=14, index='end', iid=17, text="Child", values=("Subitem 3.3", "Value 3.3"))
treeview.insert(parent=14, index='end', iid=18, text="Child", values=("Subitem 3.4", "Value 3.4"))
treeview.insert(parent='', index='end', iid=19, text="Parent", values=("Item 4", "Value 4"))
treeview.item(19, open=True)
treeview.insert(parent=19, index='end', iid=20, text="Child", values=("Subitem 4.1", "Value 4.1"))
treeview.insert(parent=19, index='end', iid=21, text="Sub-parent", values=("Subitem 4.2", "Value 4.2"))
treeview.item(21, open=True)
treeview.insert(parent=21, index='end', iid=22, text="Child", values=("Subitem 4.2.1", "Value 4.2.1"))
treeview.insert(parent=21, index='end', iid=23, text="Child", values=("Subitem 4.2.2", "Value 4.2.2"))
treeview.insert(parent=21, index='end', iid=24, text="Child", values=("Subitem 4.2.3", "Value 4.2.3"))
treeview.insert(parent=19, index='end', iid=25, text="Child", values=("Subitem 4.3", "Value 4.3"))

root.mainloop()
실행해보면
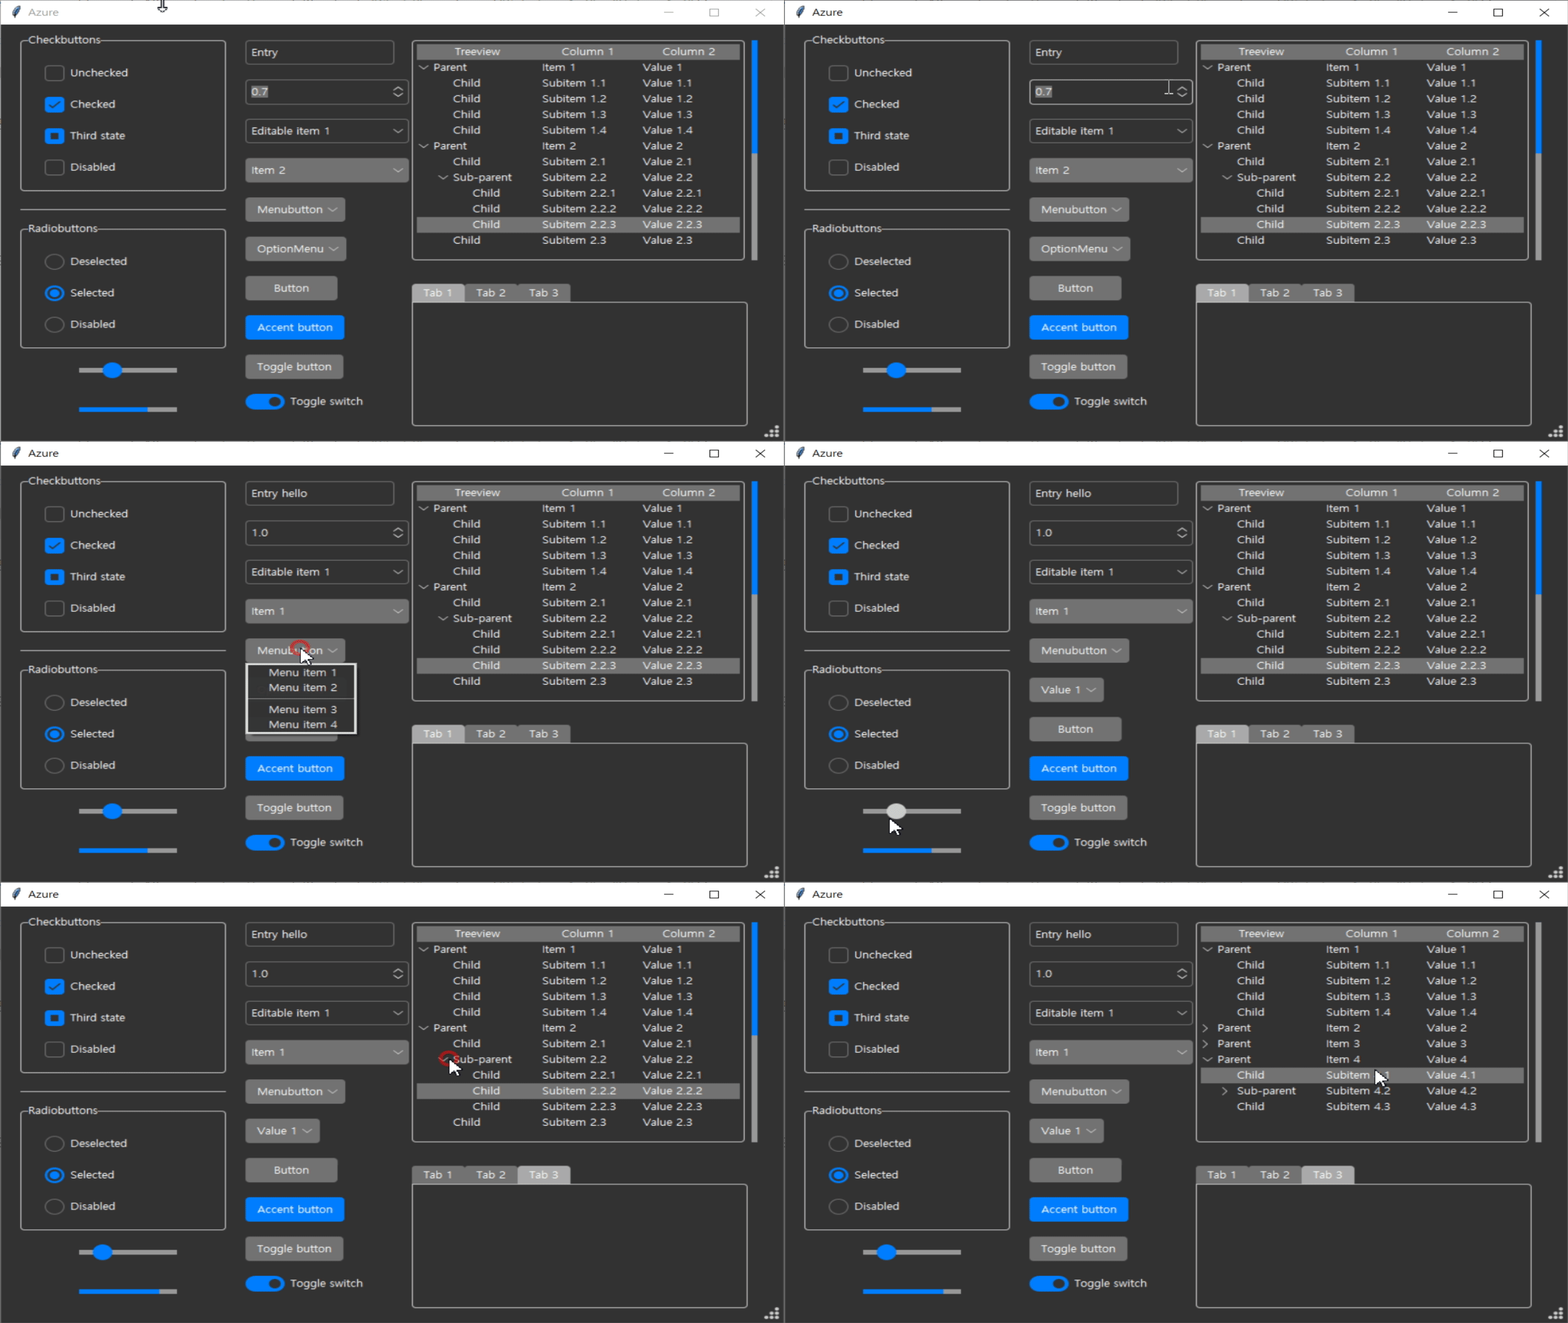
굉장히 깔끔하네요.
3. ttkbootstrap 적용하기
주의사항 : 첫 번째로 보여드린 ttkthemes와 ttkbootstrap을 같이 사용하는 경우 오류가 발생합니다.
마지막으로 보여드릴 테마적용 방법은 ttkbootstrap 모듈을 이용하는 것입니다.

이 모듈이 참 재밌는 게, 이름에 걸맞게 웹개발에 사용하는 bootstrap의 클래스명이 여기에 유사하게 적용됩니다.
ttkbootstrap - ttkbootstrap
ttkbootstrap A supercharged theme extension for tkinter that enables on-demand modern flat style themes inspired by Bootstrap. 📦 Features ✔️ Built-in Themes Over a dozen curated dark and light themes ✔️ Pre-defined Styles: Loads of beautiful pre
ttkbootstrap.readthedocs.io
공식문서에서도 ttkbootstrap이 실제 bootstrap에서 영감을 받아 제작된 모듈이라고 소개하고 있습니다.
A supercharged theme extension for tkinter that enables on-demand modern flat style themes inspired by Bootstrap.
1. 적용방법
ttkbootstrap을 적용하려면 먼저 pip로 ttkbootstrap을 설치해야 합니다.

적용방법도 간단합니다. from tkinter import ttk 대신에
import ttkbootstrap as ttk
from ttkbootstrap.constants import *
이 두 줄로 임포트를 합니다.
특정 엘리먼트에 스타일을 적용하는 방법은
import tkinter as tk
import ttkbootstrap as ttk
from ttkbootstrap.constants import *

root = tk.Tk()

b1 = ttk.Button(root, text="Button 1", bootstyle=SUCCESS)
b1.pack(side=LEFT, padx=5, pady=10)

b2 = ttk.Button(root, text="Button 2", bootstyle=(INFO, OUTLINE))
b2.pack(side=LEFT, padx=5, pady=10)

root.mainloop()
이런 식으로 요소 인스턴스를 생성할 때 bootstyle을 적용하는 것입니다.
위 코드를 실행하면 아래와 같은 창이 생성됩니다.
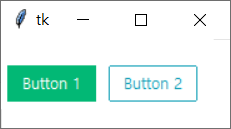
메인윈도우창마저도 ttkbootstrap 적용이 가능한데,
ttkbootstrap.Window 클래스를 tk.Tk 대신 사용하면 됩니다.
import ttkbootstrap as ttk
from ttkbootstrap.constants import *

root = ttk.Window()

b1 = ttk.Button(root, text="Button 1", bootstyle=SUCCESS)
b1.pack(side=LEFT, padx=5, pady=10)

b2 = ttk.Button(root, text="Button 2", bootstyle=(INFO, OUTLINE))
b2.pack(side=LEFT, padx=5, pady=10)

root.mainloop()
특정 요소가 아니라 메인윈도우 전체에 특정 테마를 적용하는 방법은 아래와 같습니다.
import tkinter as tk
import ttkbootstrap as ttk

아래 두 가지 방법 중 택일

# 1. 기존 tk위젯과 호환이 필요한 경우(traditional approach)
root = tk.Tk()
style = ttk.Style("darkly")

# 2. ttkbootstrap의 요소만 사용하는 경우-추천(new approach)
root = ttk.Window(themename="darkly")
위 코드를 적용하여 GUI창을 생성해보면
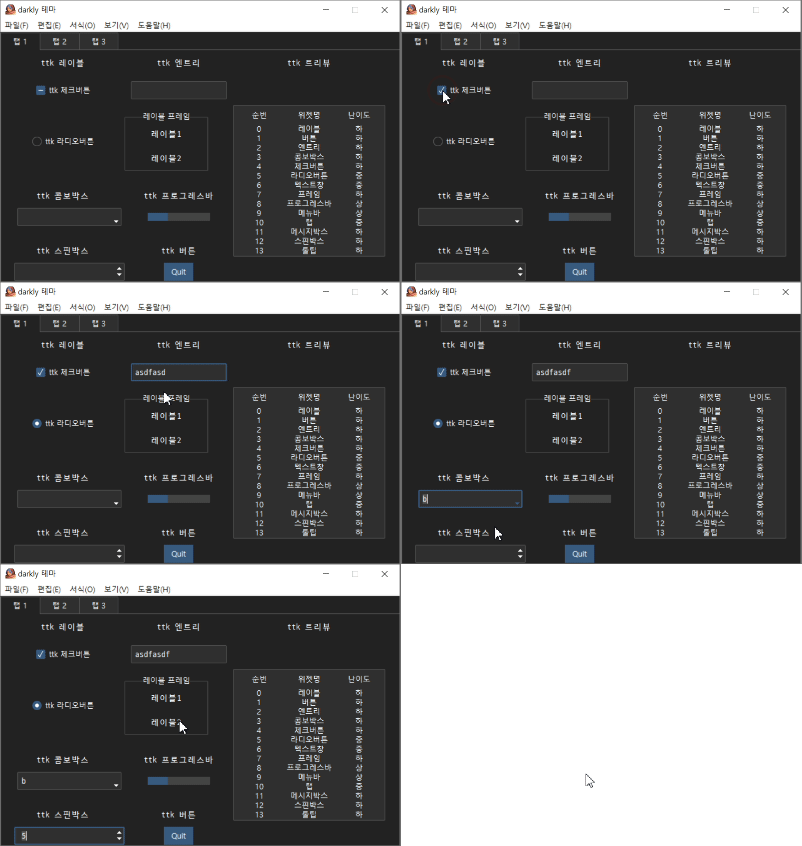
2. 부트스트랩 스타일의 컬러
부트스트랩 스타일로 위젯의 스타일 컬러를 지정할 수 있습니다.

코드는 아래와 같습니다. (bootstyle에 bootstrap의 클래스명을 입력합니다.)
import ttkbootstrap as ttk
from ttkbootstrap.constants import *

root = ttk.Window()

b1 = ttk.Button(root, text='primary', bootstyle=PRIMARY)
b1.pack(side=LEFT, padx=5, pady=5)

b2 = ttk.Button(root, text='secondary', bootstyle=SECONDARY)
b2.pack(side=LEFT, padx=5, pady=5)

b3 = ttk.Button(root, text='success', bootstyle=SUCCESS)
b3.pack(side=LEFT, padx=5, pady=5)

b4 = ttk.Button(root, text='info', bootstyle=INFO)
b4.pack(side=LEFT, padx=5, pady=5)

b5 = ttk.Button(root, text='warning', bootstyle=WARNING)
b5.pack(side=LEFT, padx=5, pady=5)

b6 = ttk.Button(root, text='danger', bootstyle=DANGER)
b6.pack(side=LEFT, padx=5, pady=5)

b7 = ttk.Button(root, text='light', bootstyle=LIGHT)
b7.pack(side=LEFT, padx=5, pady=5)

b8 = ttk.Button(root, text='dark', bootstyle=DARK)
b8.pack(side=LEFT, padx=5, pady=5)

root.mainloop()
3. 유연한 입력방식
또한 bootstyle 파라미터는 ttkbootstrap 내부적으로 제법 강력한 정규식 파싱을 거치기 때문에
아래와 같이 다양한 파라미터로도 동일한 결과를 출력해줍니다.
- "info-outline"
- "infooutline"
- "info outline"
- "outline-info"
- ("info", "outline")
- (INFO, OUTLINE)
4. 다양한 테마
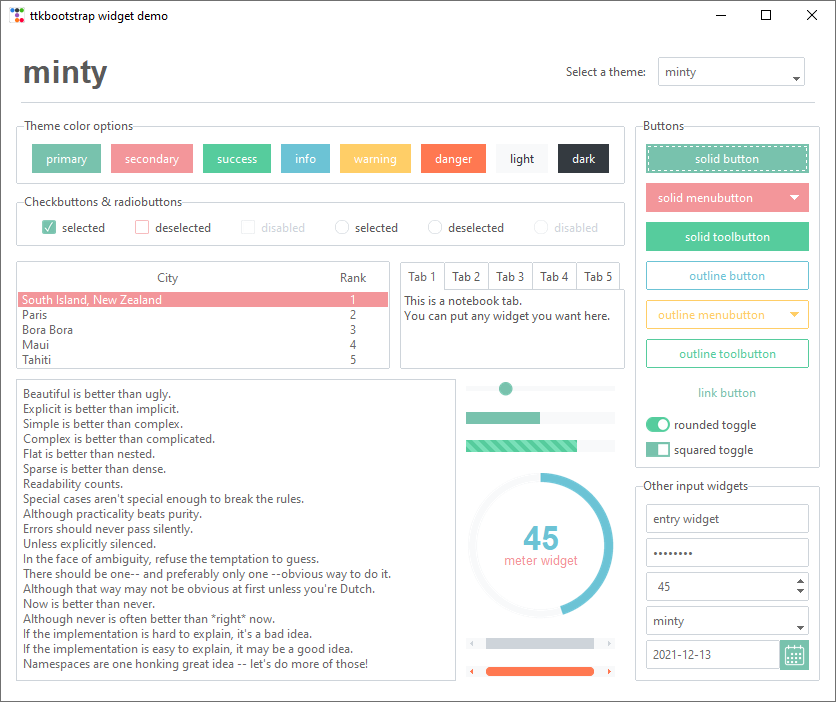
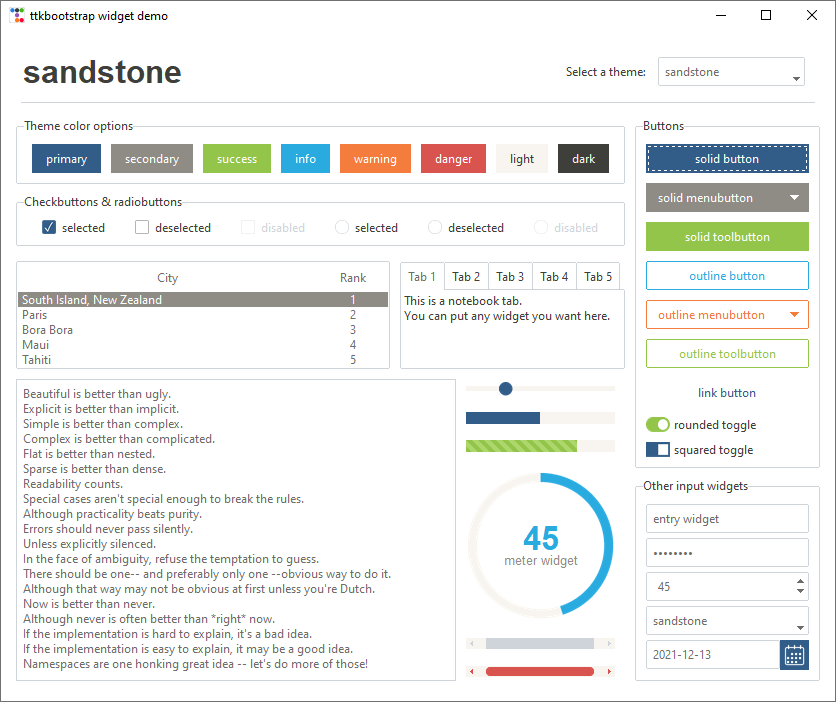
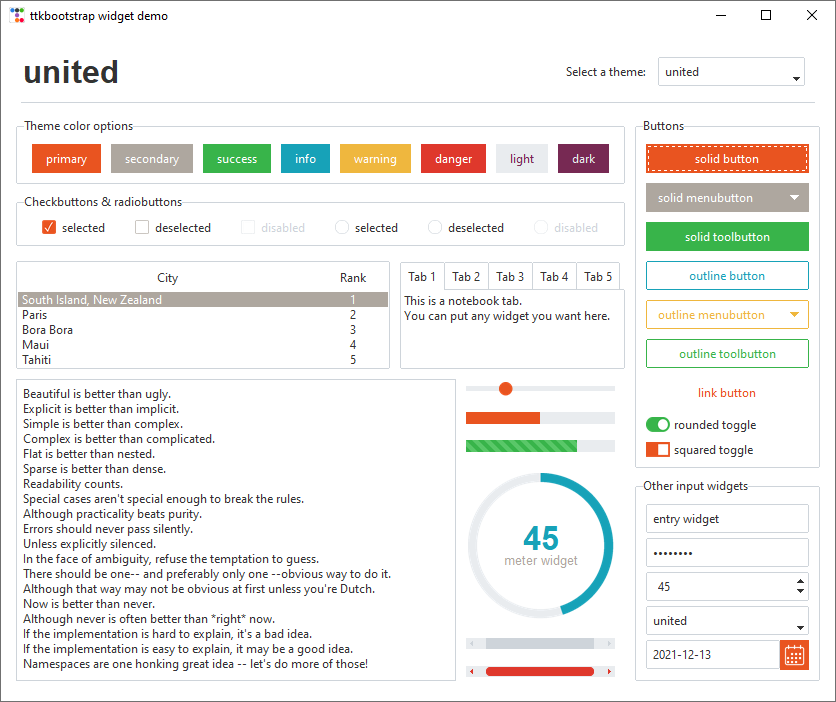
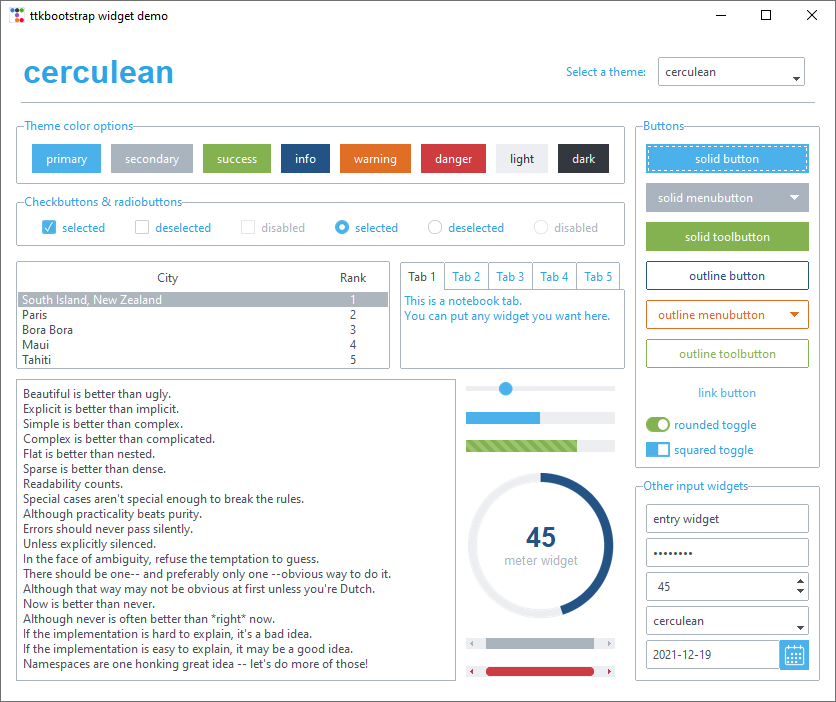
ttkbootstrap에서는 기본적으로 18개의 테마를 제공하고 있습니다.(light 13개, dark 5개)
아래는 18개 테마의 데모입니다.

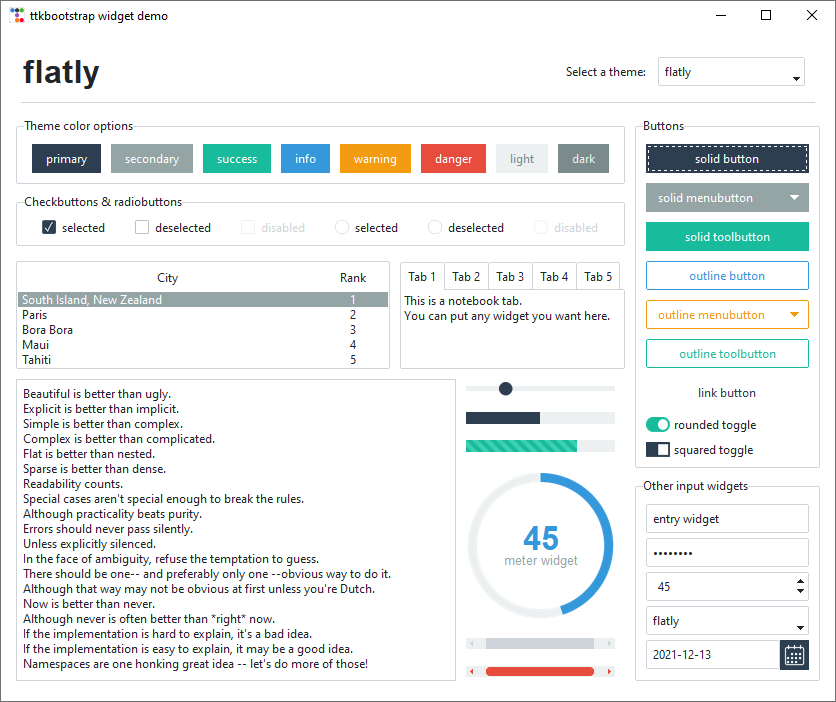





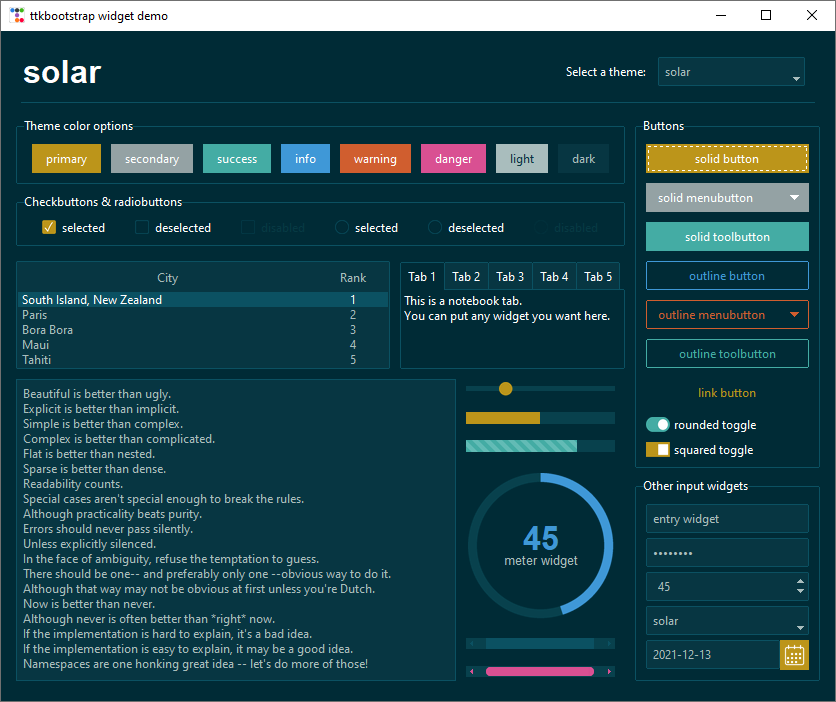

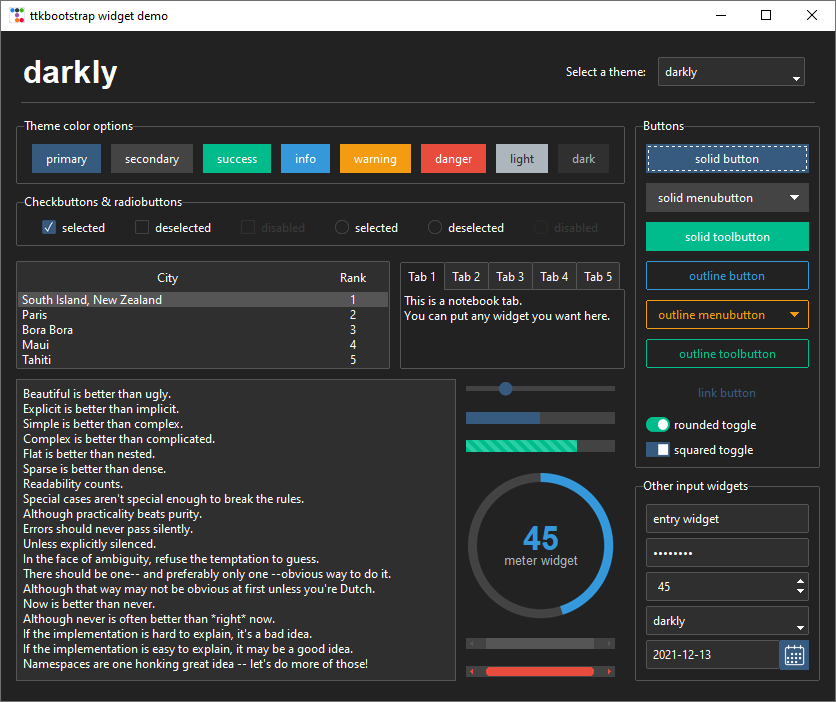


5. 다양한 위젯
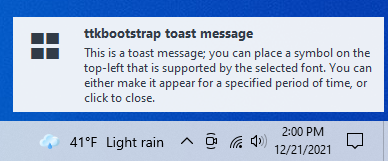
ttkbootstrap에서는 기존 위젯 뿐 아니라 datepicker(날짜선택 위젯) 나 floodgauge(레이블이 들어간 프로그레스바) 등의 새로운 위젯도 함께 제공하고 있습니다.
아래는 ttkbootstrap에서 제공하는 위젯들입니다.


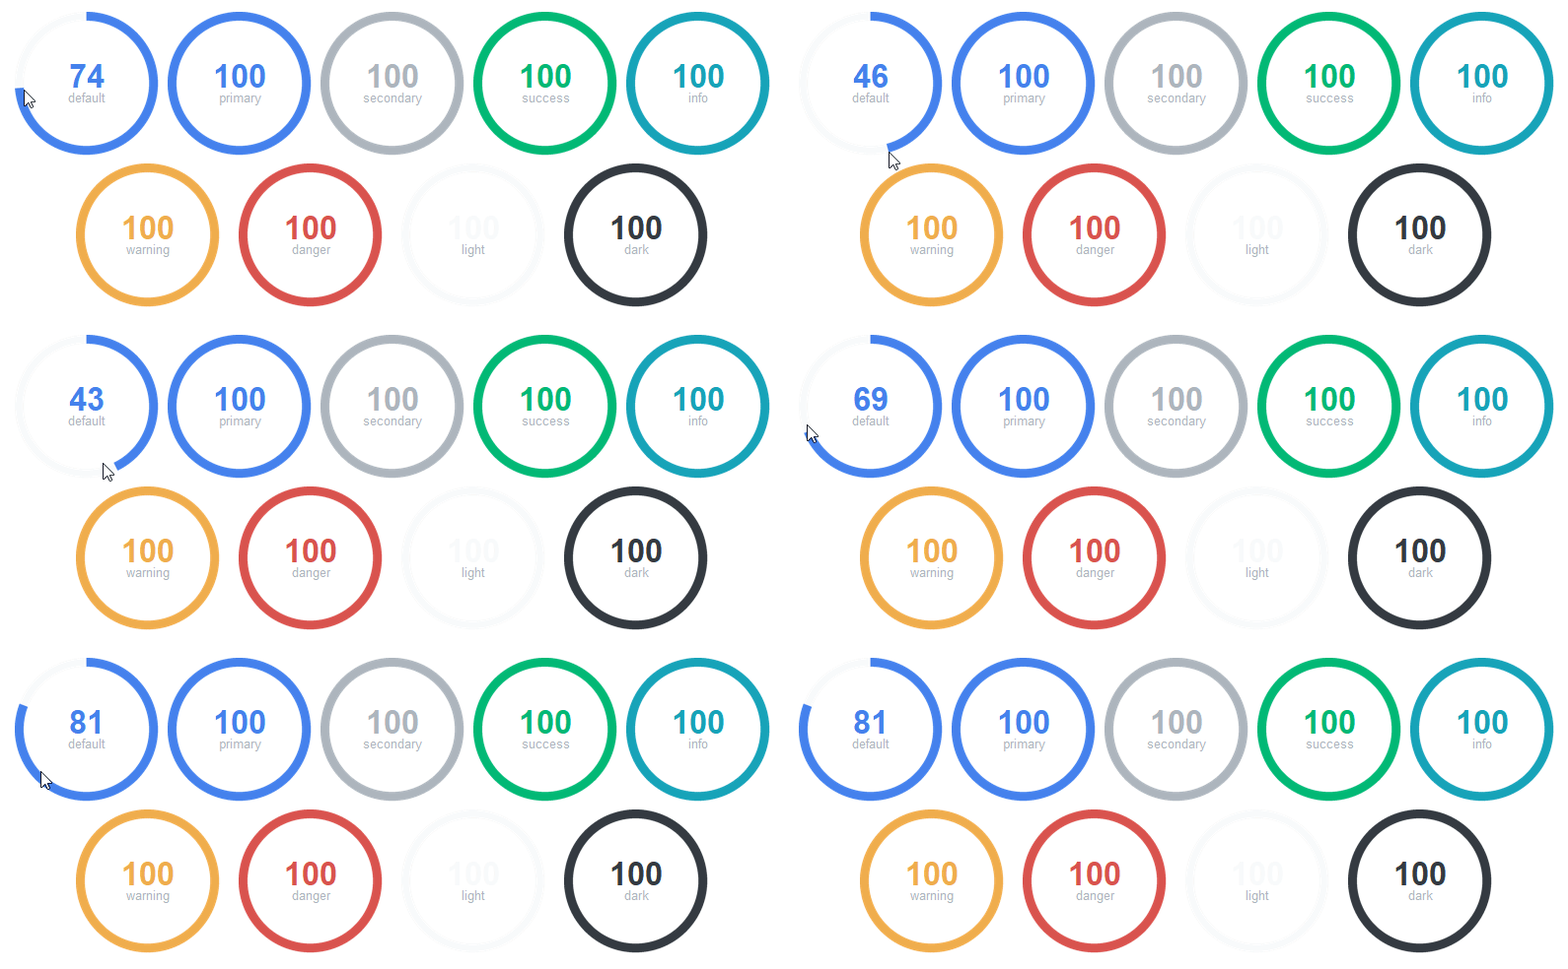





ttkbootstrap은 약 15만 회의 다운로드(월평균 8천회), 730개 깃헙스타를 받은 중견급(?) 모듈인 만큼
다른 모듈에 비해 활발한 업데이트가 이루어지고 있습니다. 게다가 굉장히 느슨한 MIT라이선스를 따르고,
커스텀 테마 제작을 위한 TTK 크리에이터 프로그램(별도설치)이나, 스타일 빌더 등을 제공하고 있어
개인적으로는 ttkbootstrap 모듈의 활용도가 가장 높아 보이기도 합니다.
마치며
tkinter의 시각적인 부분의 약점을 충분히 보완해줄 수 있는 서드파티 스타일을 적용하는 방법에 대해 알아보았습니다.
스타일 적용을 통해 여러분의 GUI에 스타일의 날개를 달아보시기 바랍니다.
다음 포스팅
작성중
'GUI 튜토리얼 > tkinter 한꼬집씩만 따라해보기' 카테고리의 다른 글
| 32. 진행표시줄(progressbar) 삽입하기 (0) | 2022.11.29 |
|---|---|
| 30. 위젯에 툴팁 붙이기 (0) | 2022.11.28 |
| 29. 스핀박스 위젯 추가하기 (0) | 2022.11.28 |


댓글